In the ever-evolving world of web development, ensuring the quality and consistency of user interfaces across different browsers and devices is crucial. Visual testing has emerged as a powerful tool to meet this challenge, allowing developers and testers to verify that applications appear and function as intended. Among the many tools available for this purpose, Cypress stands out as a robust and user-friendly option, empowering teams to automate their visual testing processes with ease.
This blog post will guide you through the essentials of getting started with Cypress for visual testing. From installation to implementation, it will cover the step-by-step process, providing insights into how Cypress can enhance the testing strategy.
What is Visual Testing?
Visual testing is a crucial aspect of software quality assurance, focusing on verifying the user interface of an application appears as expected. Unlike functional testing, which ensures that the code performs its intended operations, visual testing aims to catch discrepancies in the UI layout, styles, and overall appearance that affect the user experience.
For those interested in a comprehensive exploration of visual testing, including its advantages and best practices, a detailed article is available here to guide you with an overview of visual testing and its advantages.
Getting started with Cypress
Cypress is more than just a testing tool; it's a game-changer for software quality assurance. It is based on JavaScript and designed specifically for modern web applications, it offers an intuitive setup and a rich feature set that simplifies the testing workflow. For technology experts, software quality analysts, and engineers, Cypress provides a streamlined approach to both functional and visual testing, integrating seamlessly into the development pipeline.
Although Cypress doesn’t have built-in visual testing capabilities, it supports various plugins designed to perform visual testing effectively. By integrating these plugins, developers can leverage Cypress to conduct robust visual testing, ensuring a seamless and visually appealing user experience.
Steps to install Cypress on your local machine
To install Cypress on your local machine, ensure that Node.js 12 or above is present
- Create a project folder and open the terminal to run the following command.
npm init - Enter the required details; this will create a 'package.json' file.
- Install Cypress
npm install cypress --save-dev - Install all required dependencies
You can check the necessary dependencies here. - Launch the Cypress Test Runner.
After completing the installation, use the following command to launch the test runner:npx cypress open - Using TypeScript in Your Framework.
We have used TypeScript in our framework. You can find information on how to install and use it here.
Using the Cypress Image Diff Plugin for Visual Regression Testing
Cypress Image Diff Plugin
This tool was created to make visual regression testing as simple as possible by exposing basic functions that allow you to view the differences between images. The wrapper uses pixelmatch, which is simple and powerful, and relies on Cypress to take screenshots.
The plugin works by comparing a reference image (base image) to the current screenshot of the website. If there are any discrepancies between the reference image and the current one, the test will flag the differences. You have the flexibility to define the tolerance level for these differences, determining when a test should pass or fail based on the visual discrepancies detected.
Installing the Plugins:
- Install the core package for the Cypress image difference plugin.
npm i cypress-image-diff-js - Install the Cypress image difference HTML report, which helps generate reports.
npm i cypress-image-diff-html-report - Import and initialize the Cypress image diff plugin in ‘cypress.config.ts':
import { defineConfig } from 'cypress'; import getCompareSnapshotsPlugin from 'cypress-image-diff-js/plugin'; export default defineConfig({ e2e: { setupNodeEvents(on, config) { return getCompareSnapshotsPlugin(on, config); }, }, }); - Add the following commands in ‘e2e.ts’:
import compareSnapshotCommand from 'cypress-image-diff-js/command'; compareSnapshotCommand(); - Command for visual testing using this plugin:
It has the following options available: cy.compareSnapshot Commandcy.compareSnapshot()
There are additional features in this plugin for which you will have to set a custom config file, i.e.,‘cypress-image-diff.config.ts’, in the root directory alongside ‘cypress.config.ts’.
The various values set in them are defined here: custom values
The hierarchy of the folders to access the screenshots and reports should be maintained as shown here: folder hierarchy
Test Case:
describe('To visual test the component', () => {
    it('should load Initialyze website and perform visual comparison', () => {
	    // Visit the Initialyze website
        cy.visit('https://www.initialyze.com/')

       // Perform a visual comparison of the component
       cy.compareSnapshot('component')
    })
})
The above code navigates to the Initialyze page and checks the component if it is visually fine.
Executing Visual Tests with Cypress
Running Tests:
Use following commands to run the tests:
npm run Test
Note: The first time you run the test, it will pass automatically because both the base and comparison images are fresh, and you might not see any difference. The base images are set in the Baseline folder and can be manually updated if needed.
Generating and Analyzing Visual Test Reports
Reporting:
After executing the tests, use the following commands to generate reports:
- Following command generates and writes the HTML report to disk if you just want to view the static report.
cypress-image-diff-html-report generate - This command serves the HTML report from a generated JSON file in an interactive mode, where you can update the baseline screenshots.
cypress-image-diff-html-report start
Cypress Image Diff HTML Report generates a beautiful HTML report from a JSON file and offers extensive features:

The above image shows how the report is displayed when the comparison passes.
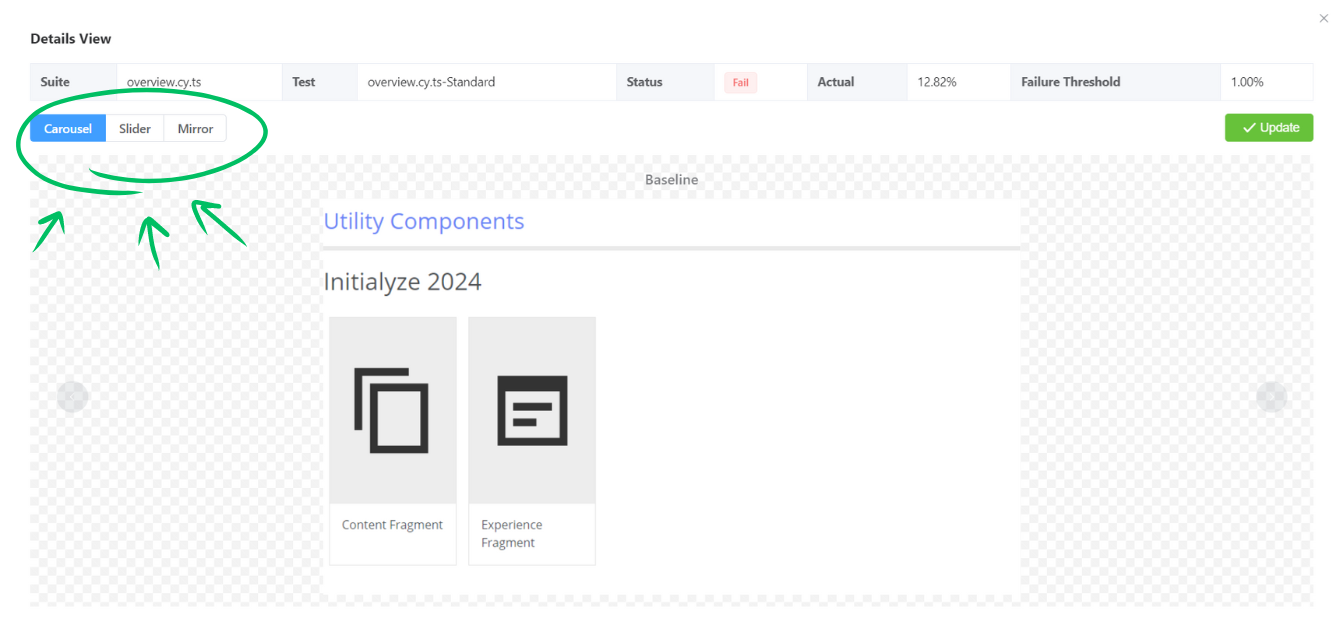
- Update Baseline Screenshots: Use the Update button for failed comparisons to update baseline screenshots if the actual images do not match the base images but passed by pixelmatch.
- Screenshot Inspector Modes: Toggle between different screenshot inspector modes: carousel, slider, and mirror, to check the differences pixel by pixel.
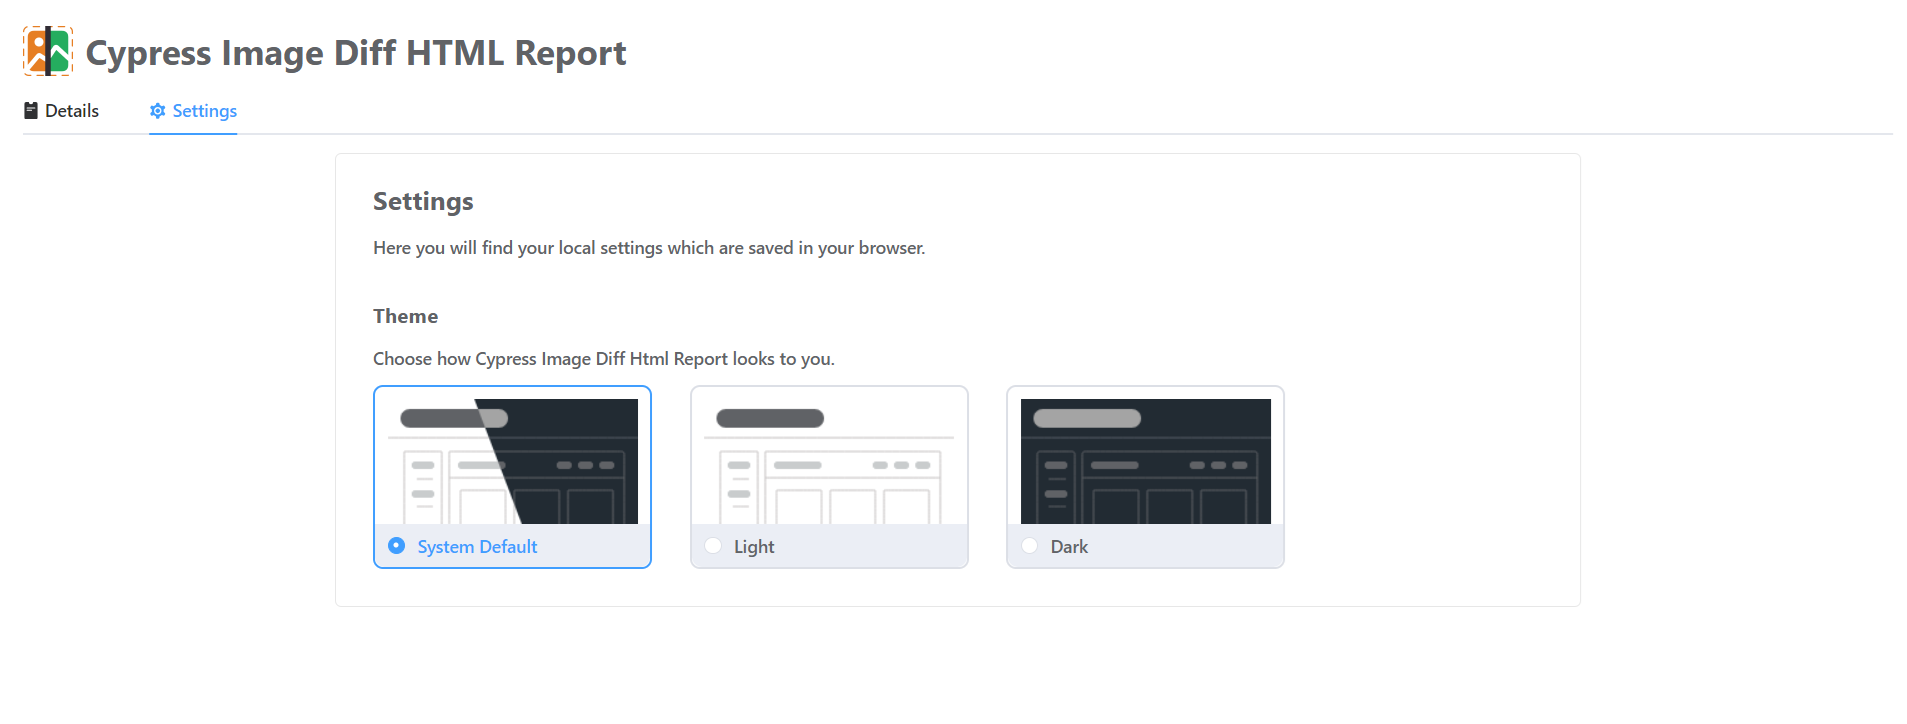
- Customizable Dashboard Layout: The report dashboard layout offers different color schemes, allowing you to select your preferred scheme.
 The above image shows the report comparison has failed and we can update the base image.


Conclusion:
Visual testing is vital for ensuring web applications deliver a consistent and high-quality user experience. By catching UI discrepancies early, visual testing helps maintain seamless interfaces. Cypress offers a powerful solution for enhancing visual testing capabilities, especially with plugins like the Cypress Image Diff Plugin, which automates visual regression testing. This enables teams to detect UI changes and issues before they impact users.
Cypress's features, such as detailed report generation and baseline screenshot updates, support continuous improvement. For developers and testers, using Cypress streamlines the testing process and upholds high web development standards.
Organizations looking to optimize their testing processes can benefit from a partnership with experts in Cypress and visual testing. Initialyze can help implement best practices and provide the expertise needed to enhance your testing strategy, ensuring exceptional user experiences.
